Sprawa chyba sie wyjaŇõniŇāa co do magicznie niedziaŇāajńÖcych ŇõwiateŇā mijania. U niekt√≥rych nie dziaŇāajńÖ teŇľ np kierunki. Ot√≥Ňľ okazuje sińô, Ňľe jest coraz wińôcej przypadk√≥w niekontaktujńÖcych konektor√≥w we wŇāńÖczniku ŇõwiateŇā w manetce kierunkowskaz√≥w. Na wyspach juŇľ byŇāa kilka przypadk√≥w, a u nas w tym wńÖtku juŇľ teŇľ co najmniej dwa. ChŇāopaki na wyspach rozbierajńÖ je i podginajńÖ blaszki od konektor√≥w. Niestety jest trochńô roboty bo Ňľeby zdjńÖńá manetki (obie sńÖ zintegrowane w caŇāoŇõńá) trzeba zdjńÖńá poduszkńô i kierownicńô.
MajńÖ nawet tutka, ale z oczywistych powod√≥w po angielsku. Pozwolńô sobie go wkleińá.
(Ňļr√≥dŇāo:
http://www.toyotaownersclub.com/forums/topic/159176-guide-how-to-fix-the-indicator-stalk-yourself/)
Do the following:
1) Disconnect the battery!!! This is important as you will be unplugging an airbag but don’t worry it isn’t dramatic you just need to make sure it is dead and no battery connected is the easiest way.
2) Undo the 2 Torx screws in the side of the steering wheel that hold the airbag in place and gently pull it forward.
3) Remove the wiring plug for the horn from the centre hub connector and remove the wiring for the airbag from the airbag itself and leave the airbag wiring to the centre hub. The airbag plug is yellow and has a lock on it, to explain the lock is tricky but a picture say a thousand words so go to
http://www.justanswe... the connector.
4) Now undo the 19mm centre bolt that holds the steering wheel on but only move it 2 or 3 turns. Get a helper now for 2 minutes. Try to pull the steering wheel off, it won’t come off because it is on a taper, but keep pulling and get your helper to tap, and I do mean tap, the centre nut with a hammer and the vibration will loosen the taper and the steering wheel will pop forward.
Remember I said only loosen the nut 2 or 3 turns? When the steering wheel jumped forward it stops on the nut and not on your nose! Now gently push the steering wheel back, remove the nut, mark the steering wheel so you know where it came off and remove the steering wheel.
5) Now you lose the plastic trim. 2 screws in the front and the top wriggles off and 1 screw in the bottom and the bottom plastic also wriggles free.
6) Now you see wiring central of this little car, don’t panic it all plugs in. The central hub that connects the airbag and horn needs to go first and is held on by 3 clips and about 120 degrees apart. There is one directly at the top and 2 more at bottom left and bottom right. To free them just bend them back very slightly and pull the hub away from the car. There is enough wiring here to leave the hub connected and just let it hang down loose.
NOTE. The front of the hub is designed to turn when the back doesn’t, this is how you can move the steering wheel and not break to wires. There is however a limit to this and if you let the front move to much it will fail when you put it all back together. Easiest fix is just wrap a bit of stick tape around the ring and that will stop the front and back rotating.
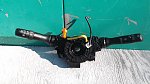
7) Next unplug the 3 plugs that connect the faulty stalks, I say stalks because they both come off together. Look at the top between the stalks and the speedo and you will see a clamp you usually see on coolant hoses, this is what holds the stalks on and to be fair it works fine. Either use long nosed pliers to pinch it together and pull the stalks off or undo the 2 10mm bolts that hold the speedo in and lift that clear to give you a bit more room to work.

Yippee! you now have the stalks in your hand and it should take about 15 minutes to this point.
9) Working on the back of the stalks, undo the 2 tiny screws that hold the back cover on the indicator side, they are right up against the stalk itself and then unclip the cover from the centre (a small screwdriver will ease the clips off). Once the cover is off you see the main board inside.
10) There is only 1 screw in the middle of this and some clips to tease off along the edges. The centre section is again the tightest but be patient and it will clip out and the board comes free. There is a wire to this board but you don’t need to unplug it as there is plenty of play in the wire.
11) Now you see the heart of the switch. There is a tiny little brass connector with 3 arms at the end of the stalk that is the problem, you will see the arc it moves on very clearly on the back of the board you just took out. The arms have bent back with the years and no longer make a good contact, to fix just bend each arm back up by a mm or so, clean the muck of the board where is contacts, a fresh drop of special grease and clip it back together.
12) To test it simply clip the board back in and replace the screw, don’t worry about the back cover as that only keeps the muck out, plug it back in, connect the battery and try it.
NOTE. Doing this will store a fault in your airbag ECU because you have just turned the ignition on with no airbag connected but the airbag light doesn’t stay on once it is all put back together. To avoid this you can either plug the airbag back in as well or put it all back together now if you are confident.
13) A bit of a faff but not difficult and will save you a fair bit against the price of new stalks and the garage bill.


